Solved: Startup Repair Cannot Repair This Computer Automatically
Languages: English Français Español 日本語
Summary :
Startup Repair is used to fix the issue when your computer won’t boot properly. However, you may encounter the error “Startup Repair cannot repair this computer automatically” while using it. Given that situation, you can refer to this post offered by MiniTool Solution. It will show you multiple methods to fix this error. Hope this post can be helpful.
Quick Navigation :
- “Startup Repair Cannot Repair This Computer Automatically”
- Fixes for “Startup Repair Cannot Repair This Computer Automatically”
- Top Recommendation: Create the System Image to Safeguard Your PC
- Conclusion
- Startup Repair Cannot Repair This Computer Automatically FAQ
- User Comments
“Startup Repair Cannot Repair This Computer Automatically”
If Windows can’t help you fix a misconfigured computer and it cannot start the computer in the normal state, an error “Startup Repair cannot repair this computer automatically” will occur. Windows 7 Startup Repair cannot repair this computer automatically is the same as the error – Automatic Repair couldn’t repair your PC in Windows 10/8/8.1.

How To Fix “Windows Automatic Repair Not Working” [SOLVED]
Windows Automatic Repair not working! Read this post to find how to solve Windows couldn’t load correctly and Automatic Repair couldn’t repair your PC.
Read More
If you click View problem details, it will show more details but there is no solution suggested. Only computer specific variables will be displayed:
Problem Event Name: StartupRepairOffline
Problem Signature 01: 6.1.7600.16385
Problem Signature 02: 6.1.7600.16385
Problem Signature 03: unknown
Problem Signature 04: 21200442
Problem Signature 05: AutoFailover
Problem Signature 06: 65
Problem Signature 07: CorruptFile
OS Version: 6.1.7600.2.0.0.256.1
Locale ID: 1033
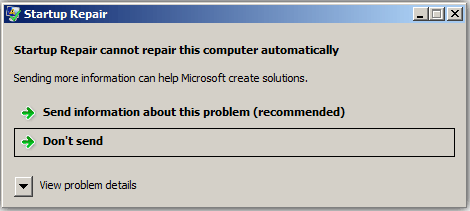
On different operating systems, the problem signature may display variables that are different from the variables above.
Then why does Startup Repair fail to work? You need to know that there are some reasons for this error: there might be a problematic device attached to your computer, you have the damaged file system of your system disk, the MBR of the hard drive is corrupted, etc.
Luckily, you can fix it.

SOLVED: Laptop Stuck on Preparing Automatic Repair during Startup
Laptop stuck on Preparing Automatic Repair during startup? Read this post and find how to effectively and quickly solve this issue.
Read More
Fixes for “Startup Repair Cannot Repair This Computer Automatically”
The following part will show you how to fix “Startup Repair Cannot Repair This Computer Automatically” in detail. If you are interested in this topic, please read on.

You Can Fix Boot Issues by Startup Repair on Windows 10
Do you know how to fix boot issue by Startup Repair Windows 10? No, in this post we will show you three cases and three ways to do that job.
Read More
Method 1: Remove Peripheral Devices
Sometimes, Startup Repair fails because of the connected device. According to Microsoft, you can try to remove the device and restart the computer to fix this issue, if you recently attached a device to your computer, such as a camera or portable music player.
If this method doesn’t work, there are many other ways given below for you to try.
Method 2: Run friend.com.vn
Bootrec is also known as the friend.com.vn utility. It is a tool offered by Microsoft in the Windows Recovery Environment. friend.com.vn can help you to repair errors of MBR, BCD, Boot Sector, and friend.com.vn.
If a corrupted MBR or BCD is causing the problem, you can try correcting the MBR or BCD record with the help of bootrec to fix the problem. Here, you can follow the instructions given below to run friend.com.vn.
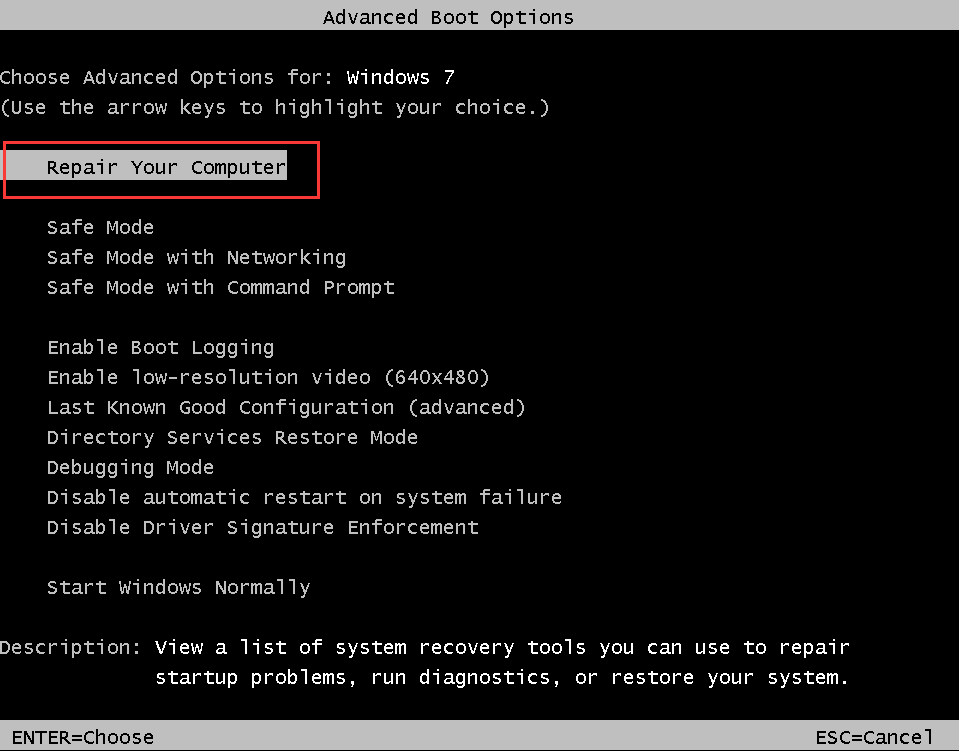
Step 1: Restart your computer and hold F8 until the Advanced Boot Options window appears.
Step 2: Select Repair Your Computer among the available boot options.
Step 3: A new small window will pop up. Now, select Command Prompt to continue.
Step 4: Enter the following commands in order and press Enter after each to run these commands:
bootrec /fixmbr
bootrec /fixboot
Step 5: After the operation is completed successfully, reboot your system.
Right now, you can check if “Startup Repair cannot repair this computer automatically” is solved at the startup.
Method 3: Run CHKDSK
Bad sectors and file system errors can also be reasons why Startup Repair cannot repair. Thus, you can try to run CHKDSK to fix this error.
CHKDSK is a system tool in Windows that can verify the integrity of a volume and fix logical system errors. It can also identify bad sectors that exist on the hard disk and mark them so that the computer uses the drive without the errors.

[SOLVED] CHKDSK Is Not Available for RAW Drives? See Easy Fix
When you are facing CHKDSK is not available for RAW drives error, do you know how to fix it? Now, read this post to solve this issue without data loss.
Read More
How to run CHKDSK in Windows? Here are the steps on how to do that.
Step 1: Open Command Prompt following the instructions mentioned above.
Step 2: Type this command: chkdsk C: /f /r in the command prompt window and press Enter to run it.
Tip: “C” stands for the drive letter of your Windows installation drive.
Step 3: Restart your system. CHKDSK will scan your hard drive for any issues and fix them accordingly.
After that, “Startup Repair cannot repair this computer automatically” should be solved.

I Find CHKDSK Deleted My Data – How To Recover Them
CHKDSK deleted my data now becomes a common problem, so I decided to provide a useful solution for you.
Read More
Method 4: Run Windows SFC Tool in Safe Mode
SFC (System File Checker) is a built-in tool provided by Windows. It can help check and repair the corrupted or missing system files. In addition, you don’t need the Windows installation CD while using this tool. What you need to do is to boot your computer into the Safe Mode with Command Prompt. Here is how to do that.

3 Solutions for SFC Scannow There Is a System Repair Pending
This post shows how to fix the error there is a system repair pending which requires reboot to complete which occurs when running sfc scannow command.
Read More
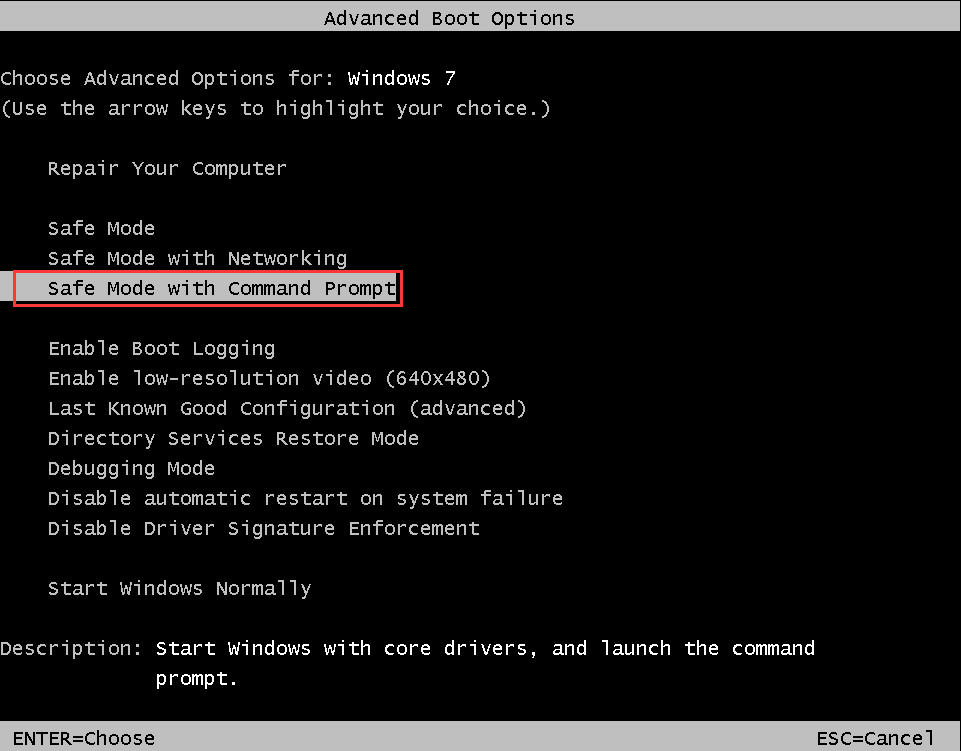
Step 1: Restart your computer and hold F8 until the Advanced Boot Options window appears.
Step 2: Choose Safe Mode with Command Prompt among the available advanced boot options.
Step 3: In the Command Prompt window, type this command: sfc /scannow and press Enter to execute it.
Step 4: After successfully running the command, restart your computer.
After that, “Startup Repair cannot repair this computer automatically” should be solved.

SFC Scannow Can’t Fix Files after July 9 Updates, Microsoft Confirms
Many users reported the issue – Windows 10 SFC scannow unable to fix files after installing July 9 updates. Now, Microsoft has confirmed this issue.
Read More
Method 5: Clean Boot Your Computer
If the solutions mentioned above don’t work out, you can load your computer in Safe Mode and try to clean boot your computer. In this way, you can open your PC with a minimal set of drivers and programs, enabling only essential services and disabling all others.
Here are the steps on how to clean boot your computer.
Step 1: Press the Win key + R key at the same time to open the Run dialog box. Then, type msconfig in the dialogue box and press Enter to open System Configuration.
Step 2: When the new window pops up, switch to the Boot tab. Navigate to Boot options, check the Safe boot option and set the option as Minimal. After that, click Apply to save changes.

Step 3: Then, switch to the Services tab. To hide all Microsoft related services leaving behind all the third-party services, check Hide all Microsoft services in the lowerleft corner. To disable all the third-party services, click the Disable all button. Click Apply to save changes.

Step 4: Now, switch to the Startup tab. Select all of the present services and click the Disable all button present in the lower right corner of the window. Click Apply to save changes.

Step 5: After saving all changes, try booting the computer in the normal mode.
After that, “Startup Repair cannot repair this computer automatically” should be solved.
Tip: If you want to clean boot Windows 10, you can refer to this related article: How to Clean Boot Windows 10 and Why You Need to Do So?
Method 6: Perform a System Restore
If you’ve created a Windows system restore point before this problem happens on your computer, you have the chance to revert your PC to its original normal state by performing a system restore. Here is how to do that.

6 Ways to Restore Point Cannot Be Created – Fix#1 Is the Best
Are you still troubled by the issue restore point cannot be created? This post shows 6 solutions to solve the problem restore point could not be created.
Read More
Step 1: Click here to download and create Windows 7 installation disc.
Step 2: Connect it to your computer and boot from it.
Step 3: Select the proper language, time and keyboard input.
Step 4: Choose Repair your computer.
Step 5: Now, all of the available system recovery options in Windows 7 will be listed. Choose System Restore, follow the System Restore Wizard instructions shown on the screen and choose an appropriate restore point.
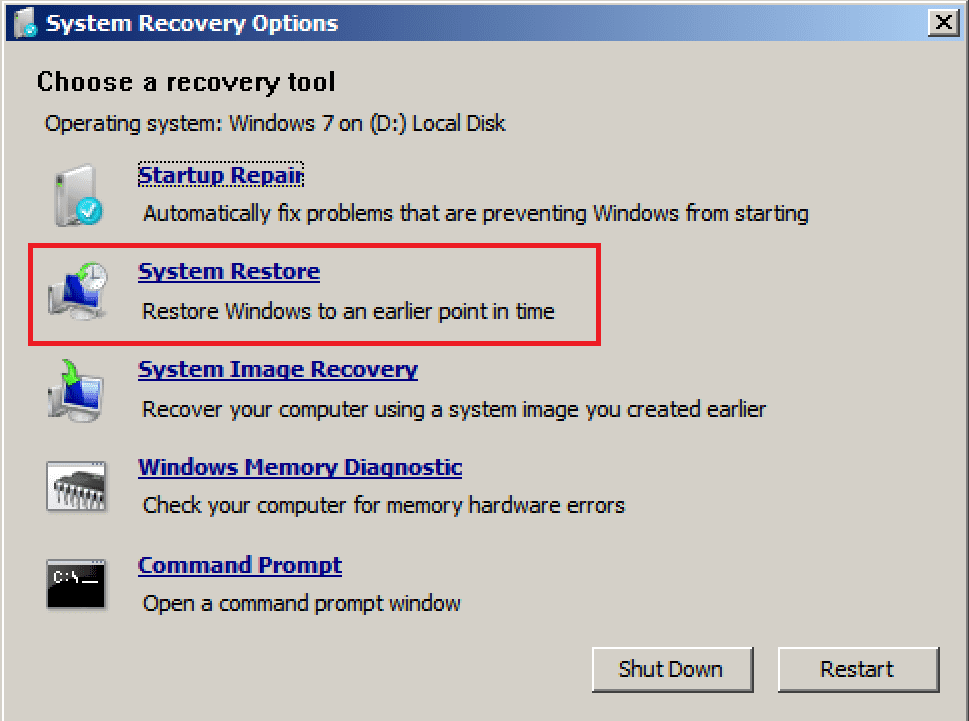
Step 6: Click Finish to restore the system.
After the operation is complete, you should be able to use your computer normally and “Startup Repair cannot repair this computer automatically” should not appear again.
I recently received an error message saying “Startup Repair cannot repair this computer automatically”. After reading this post, I have successfully fixed this friend.com.vn to tweet
Top Recommendation: Create the System Image to Safeguard Your PC
After trying the methods mentioned above, you should manage to fix the “Startup Repair cannot repair this computer automatically” issue on your computer.
However, some system issues will still occur on your computer in the future, which could make you frustrated. System image recovery could be a great solution provided that a system image was created ahead of time.
With the system image, you can restore your PC to the previous normal state after the problem happens on your computer. Therefore, how do you create a system image? A piece of the professional backup software – MiniTool ShadowMaker is your best assistant.
It is compatible with Windows 7/8/10. With its various powerful features, you are allowed to back up the operating system, files and folders, disks, partitions and so on.
To create a system image, just get MiniTool ShadowMaker Trial by clicking on the following button to have a try or purchase its Pro Edition to use it permanently.
Free Download
Follow the instructions below to learn how to back up your system with MiniTool ShadowMaker.
Step 1: Select the Backup Mode
1.Install MiniTool ShadowMaker and launch it.
2.Then, click Keep Trial to keep using the Trial Edition.
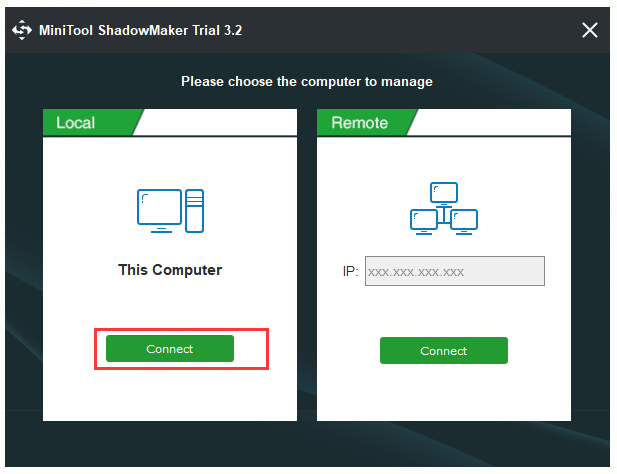
3.To manage your local computer, click the Connect button in This Computer.
Step 2: Choose Your Backup Source
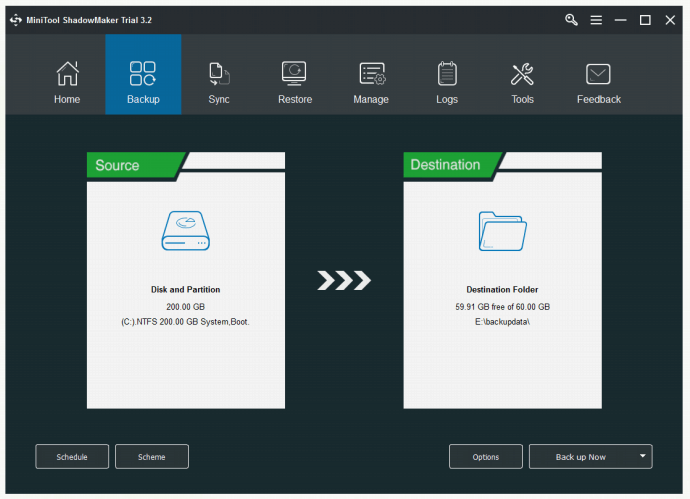
MiniTool ShadowMaker is designed to back up the operating system by default. The system reserved partition and C drive are already selected, so just move to choose a destination path to save your system image.
Step 3: Choose a Destination Path
1.Click the Destination tab in the Backup page.
2.Choose a suitable destination path and then click OK to continue.

Step 4: Start to Perform the Backup Operation
1.Right now, you can choose to click Back up Now to create a backup image right now or click Back up Later to delay this process.
2.Just click Yes to confirm your operation when a confirmation window pops up.
After you finish all the steps given above, you should have created your system image successfully now.
In addition to the fact that some system issues can appear on your computer, there is also the possibility that you will lose data when you perform some troubleshooting fixes or because of other errors. To protect your data, you can also use MiniTool ShadowMaker to back up your data in advance.
Free Download
This post introduces how to make a backup of the system with MiniTool ShadowMaker. I successfully create a system image with it. It is a really powerful backup friend.com.vn to tweet
Conclusion
“Startup Repair cannot repair this computer automatically” is a relatively complex issue related to Windows. After reading this post, you should have solved this error and now you can use your computer normally. In addition, this post also shows you a great backup program – MiniTool ShadowMaker. To safeguard your computer and data, you will need it to create a backup.
If you encounter any problems when you are using MiniTool ShadowMaker, feel free to contact us by sending an email to [email protected].
Startup Repair Cannot Repair This Computer Automatically FAQ
What is Startup Repair on my computer? Startup Repair is a recovery tool in the System Recovery Options menu. You can use it to fix certain system problems that might prevent a successful Windows 7 boot. It is designed to fix only certain problems such as missing or damaged system files that are used to load the operating system. What causes a computer not to boot up?
- Bad electrical connection.
- Power supply failure.
- Operating system failure.
- Hardware failure.
How do you troubleshoot a computer?
- Run a thorough virus scan.
- Update your software.
- Cut down on the bloat.
- Test your Wi-Fi connection.
- Reinstall the operating system.
What is error recovery?
- Error recovery is a process of taking action on an error in order to reduce its negative impact.
- This phase conducts the system to an error-free state. An incorrect state can cause a new system failure unless the error is removed.
- The ability to salvage the remaining data after a read error in the decoding process.
- Share CrocoBlock key trọn đời Download Crocoblock Free
- Cung cấp tài khoản nghe nhạc đỉnh cao Tidal Hifi – chất lượng âm thanh Master cho anh em mê nhạc.
- 9 cách tra số điện thoại của người khác nhanh chóng, đơn giản – Thegioididong.com
- Hướng dẫn kết nối PLC Mitsubishi với máy tính
- Hình Nền Mùa Đông Đẹp Cho Điện Thoại, 27 Hình Nền Ý Tưởng – friend.com.vn
- Xe Cup 82 zin xịn nguyên bản giá bao nhiêu?
- iPhone 12 Pro Max xanh dương hot nhất hiện nay có gì đáng trải nghiệm? | friend.com.vn
Bài viết cùng chủ đề:
-
HƯỚNG DẪN CÀI ĐẶT SOLIDWORKS 2014 | DẠY SOLIDWORKS
-
Việc làm thêm tại nhà: 8 website làm online uy tín không cần vốn
-
Máy khoan vặn vít dùng pin Bosch GSR 1000 10.8V – Giới thiệu
-
Top 5 sạc dự phòng tốt nhất – chất lượng giá rẻ năm 2018 – Tin tức máy chiếu
-
Vsmart Joy 4 (6GB/64GB) | Giảm ngay 700.000đ
-
Hill Climb Racing 2 Mod Apk 1.46.2 (Unlimited money) Download
-
Cách khắc phục không vào được máy khác trong mạng lan win 7 win 10
-
Samsung Galaxy S6 Edge Plus Chính hãng | Thegioididong.com
-
Tải game Nhất Nhì Ba game đánh bài Online giải trí trực tuyến – 8CHIASE.COM
-
Chọn màu xe hợp mệnh tuổi | OSUNO – KHÓA CHỐNG TRỘM OSUNO
-
Trung tâm tiếng Anh Ocean có tốt không? Có nên học không?
-
Cách kiểm tra thời gian sử dụng Windows – QuanTriMang.com
-
Top 5 ứng dụng tải phim Hot nên cài đặt cho điện thoại iPhone
-
[REMUX] Tổng hợp link tải phim Doremon 2006 – 2019 (lồng tiếng)
-
Làm Hồng Vùng Kín hiệu quả với dầu dừa | Eri International
-
Cách sửa tivi Samsung không xem được youtube thành công 100%


